
How to Use an AI Photo Editor Online
Let's talk

Creating stunning, unique images used to require expensive software and years of practice. Now, you can achieve professional-level results right from your browser. By combining a powerful photo editor online with artificial intelligence, you can transform simple pictures into captivating works of art. This guide will walk you through the entire process, making it easy for anyone to get started.
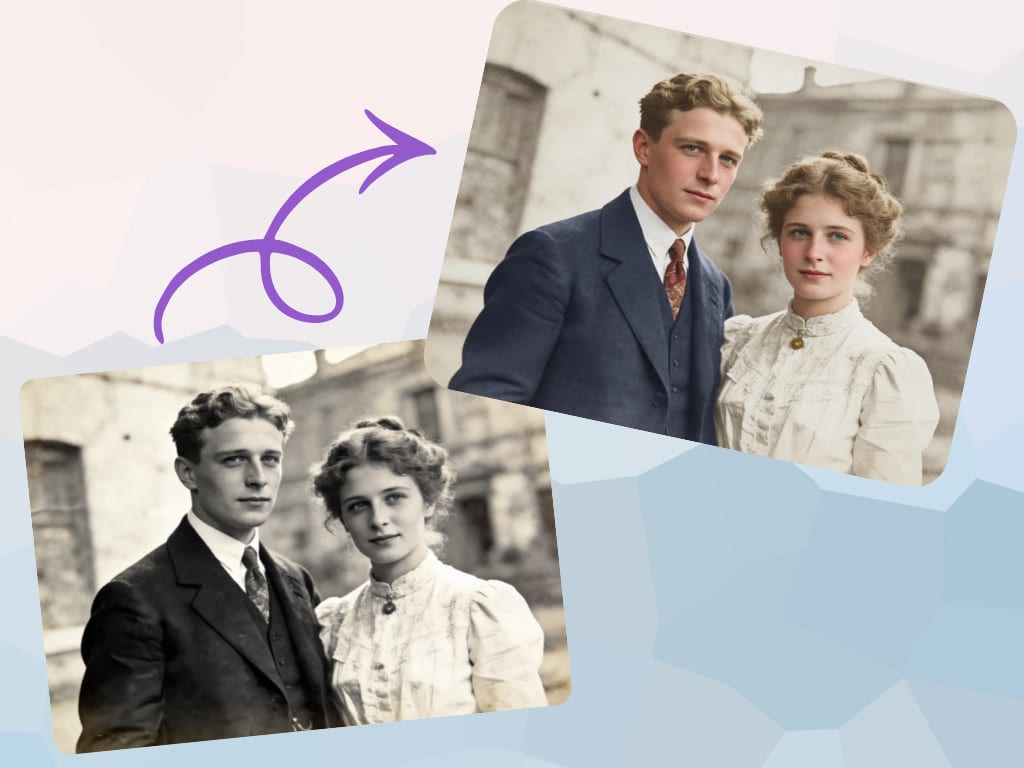
The magic happens when you use a tool that integrates both standard editing features and generative AI. This allows you to not only enhance your photos but also completely reimagine them with simple text commands. A Free Image to Image AI Generator Online uses your uploaded picture as a foundation and applies stylistic changes based on your instructions, giving you incredible creative control without a steep learning curve.
A Step-by-Step Guide to AI Image Editing
Follow these simple steps to turn your creative ideas into reality. This process breaks down how to take a standard photograph and transform it using AI-powered tools.
Step 1: Choose Your Base Image
The foundation of any great edit is a quality starting image. Before you upload anything, select a photo with good lighting, clear focus, and a decent resolution. The AI uses the data in your original picture, including colors, shapes, and composition, to inform its generation. A blurry or poorly lit photo will limit the potential of the final result. For best results, choose a photo where the main subject is clearly visible.
Step 2: Upload Your Image to the Editor
Once you have your base image, navigate to the online editor. You'll typically find a straightforward interface with an "Upload Image" button. You can drag and drop your file directly onto the workspace or browse your computer to select it. Most online tools support common file types like JPG, PNG, and HEIC, so you won't need to worry about converting your files beforehand. The image will appear on your canvas, ready for the next step.
Step 3: Write a Clear and Descriptive Prompt
This is where the creative process truly begins. A "prompt" is a text description of what you want the AI to create. The more specific your prompt, the better the AI can interpret your vision. Instead of writing "make the forest look magical," try a more detailed prompt like, "enchanted forest with glowing mushrooms, mystical fog, and bioluminescent plants, fantasy art style." Think about the subject, setting, style, and mood you want to convey.
Step 4: Adjust AI Settings and Generate
Most image-to-image generators have settings that control how much the AI alters your original photo. A common setting is "strength" or "influence." A low strength value will make subtle changes that stick closely to the source image. A high strength value will give the AI more creative freedom, potentially changing the composition and elements significantly. Start with a medium setting and click the "Generate" button to see what the AI produces.
Step 5: Refine and Edit the Generated Image
Your first AI-generated image might be close to perfect, but it often needs a few finishing touches. This is where traditional photo editing tools come in. Use the editor's built-in features to adjust brightness, contrast, and saturation to make the colors pop. You can crop the image to improve the composition or apply filters to enhance the overall mood. Don't be afraid to run the generation multiple times with slightly different prompts to get a result you love.
Step 6: Download and Share Your Creation
After you've perfected your new image, the final step is to save it. Look for a "Download" or "Export" button. You can usually choose the file format (JPG is best for photos, while PNG is ideal for graphics with transparency) and the quality. Once downloaded, your AI-enhanced image is ready to be shared on social media, used in a project, or printed.
Tips and Best Practices for Better Results
Getting the most out of an AI image generator involves a bit of strategy. Follow these tips to improve your outputs and streamline your workflow.
Start with High-Quality Images
The quality of your input directly impacts the quality of your output. An AI can't add detail that isn't there, so starting with a sharp, high-resolution photo is crucial. A clear image provides the AI with more data to work with, resulting in a more detailed and coherent final product.
Be Specific with Your Prompts
Vague prompts lead to generic results. The key to unlocking the AI's potential is detail. Instead of just naming a style, describe it.
Vague Prompt Specific Prompt
A cat in a hat A fluffy ginger tabby cat wearing a tiny blue wizard hat, sitting on a pile of ancient books, with cinematic lighting
A car on a road A red classic convertible driving on a coastal highway at sunset, dramatic ocean view, photorealistic
A building A futuristic skyscraper made of chrome and glowing glass, a cyberpunk city, a rainy night, neon reflections
Experiment with Different Styles
Don't limit yourself to one artistic direction. AI can mimic countless styles. Try prompting for different aesthetics to see what works best for your image. You can reference specific art movements, artists, or visual themes. Examples include "in the style of Van Gogh," "steampunk aesthetic," "anime art," or "vintage black and white film."
Use Negative Prompts
A negative prompt tells the AI what to exclude from the image. This is incredibly useful for refining your results and removing common AI mistakes. If the AI keeps adding text or generating distorted figures, you can add a negative prompt like "ugly, text, watermark, deformed, extra limbs, blurry" to clean up the output.
Iterate and Refine
The first generation is rarely the final one. Professional creators often generate dozens of variations before landing on the perfect image. Treat the process as an experiment. Tweak your prompt, adjust the AI strength, and generate again. Sometimes, a small change in wording can lead to a dramatically different and better result.
Common Mistakes to Avoid
As you learn, you might run into a few common issues. Here are some mistakes to watch out for and how to fix them.
Using Vague or Contradictory Prompts
A prompt like "a sunny day at night" will confuse the AI. Keep your descriptions clear, concise, and logical. If you want a night scene, focus on elements associated with it, such as "moonlight," "stars," and "dark sky." If your results are not what you expected, review your prompt for any conflicting terms.
Ignoring the Base Image Quality
Uploading a low-resolution, pixelated photo and expecting a high-definition masterpiece is a recipe for disappointment. The AI will amplify the imperfections of the source image. Always take the time to select the best possible version of your photo before you start the AI generation process.
Setting AI Strength Too High or Too Low
Finding the right balance for the AI strength setting is key. If the strength is too low, you'll barely see any changes. If it's too high, the AI may completely disregard your original photo, creating something unrecognizable. A good starting point is usually between 50-75%, which allows for significant creative changes while preserving the core composition of your image.
Forgetting Post-Generation Edits
Relying solely on the AI output can leave your image looking unfinished. The AI is a powerful tool for transformation, but the final polish often comes from standard editing. Simple adjustments to exposure, color balance, and sharpness can elevate a good AI generation into a great one. Always review the final image and make manual tweaks as needed.
Conclusion
Combining an online photo editor with an image-to-image AI generator opens up a new world of creative possibilities. It empowers you to transform ordinary photos into extraordinary visuals without needing technical expertise or complicated software. By following the steps and tips outlined in this guide, you can start creating unique, high-quality images today. The key is to experiment, refine your prompts, and have fun with the process.
About the Creator
Keep reading
More stories from CEO A&S Developers and writers in Futurism and other communities.
TBC Bank Uzbekistan Deploys AI Voice Agents Across Credit and Deposit Operations, Reshaping Customer Engagement at Scale
The application of artificial intelligence to customer-facing banking operations has crossed a critical threshold in Central Asia. What began as experimental pilot programs confined to narrow use cases has evolved into production-scale deployments that handle thousands of daily interactions across lending, collections, and deposit products. In Uzbekistan, a leading digital banking group has moved decisively into AI-driven voice communication, deploying intelligent agents capable of conducting natural, multilingual conversations with customers about credit cards, loan products, and savings accounts. The deployment represents not merely a technology upgrade but a fundamental reimagining of how banking relationships are managed at scale in a rapidly growing market.
By CEO A&S Developersa day ago in Futurism
The Fears of AI And How Much Fun It Can Be
ChatGPT has come a long way, as has AI in general. There are those people who are scared of it, and for understandable reasons. People fear that as technologies advance, they’ll be replaced in the workforce. Then, there are the fears that AI could evolve into something that brings us to the brink of extinction.
By Jason Morton3 days ago in Futurism
Insect Protein Market Analysis: Edible Insects, Food Innovation & Forecast to 2033
The way the world produces and consumes protein is changing — and insects are playing a bigger role in that shift than most people realize. Already consumed by over 2 billion people worldwide, insect protein is rapidly crossing from traditional diets into mainstream food, feed, and even personal care industries. According to IMARC Group's latest research, the global insect protein market size reached USD 1,171.4 Million in 2024. Looking forward, IMARC Group expects the market to reach USD 5,528.0 Million by 2033, exhibiting a CAGR of 18.82% during 2025-2033. The market is growing rapidly, driven by rising awareness of insect protein’s high nutritional value, growing demand for alternate protein sources, escalating prevalence of chronic conditions, increasing product adoption in animal feed, favorable regulatory environments, and rapid technological advancements in production.
By Suhaira Yusufa day ago in Futurism
Watching The End Of The World From The Diner
Introduction I am not sure how to approach this. Guy Peellaert was an amazing artist who created iconic fantasy images of famous people, usually musicians or politicians, as well as creating commissioned album covers such as "It's Only Rock'n'Roll" by The Rolling Stones and David Bowie's "Diamond Dogs" which you can read more about below.
By Mike Singleton 💜 Mikeydred 6 days ago in Art


Comments (1)
Great explanation! The balance between strength and creativity is really important — starting with a medium setting is definitely the best way to experiment and learn.